
Layered metallic table decor suits New Year celebrations because it instantly makes a dining setup feel richer, warmer, and more intentional. Mixing gold, silver, bronze, and champagne tones adds depth without needing expensive pieces. Simple stacks, repeated finishes, and reflective surfaces do most of the work. With a few trays, chargers, candle holders, and thrifted metal finds, you can create a table that looks high-end on a realistic budget. The ideas below focus on easy layering, smart reuse of pieces you may already have, and small metallic details that make the whole table feel luxe.
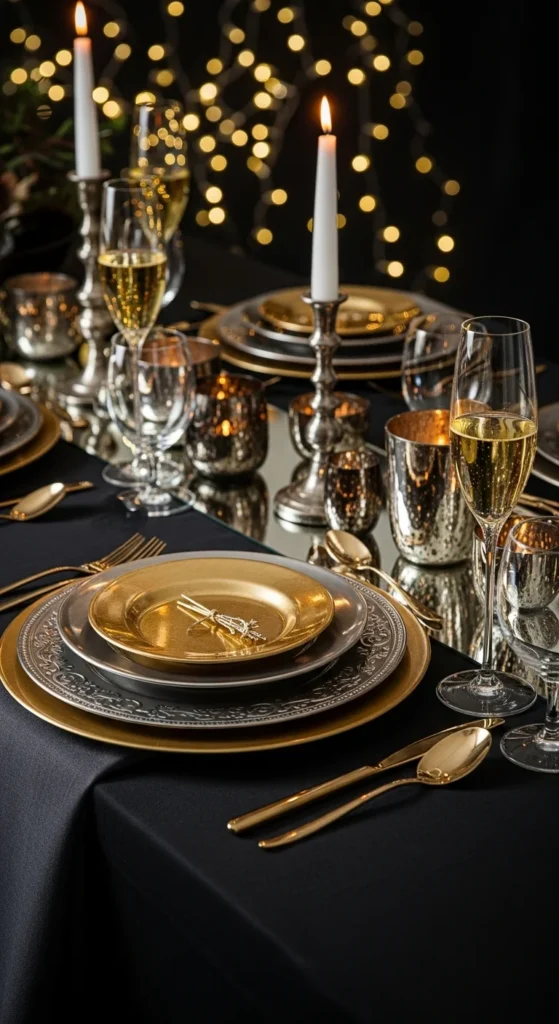
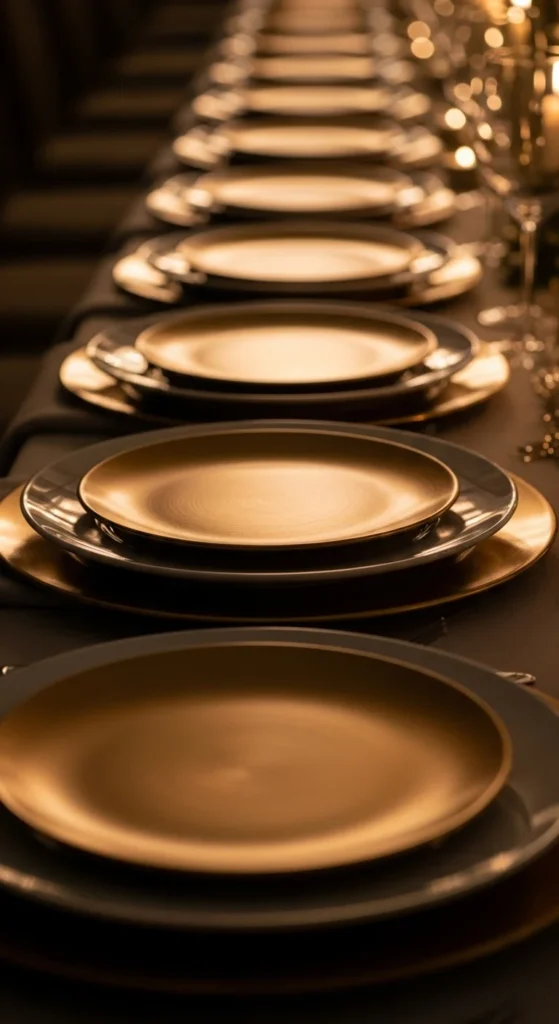
1. Stacked Mixed-Metal Chargers at Each Place
Stacking chargers is one of the simplest ways to create layered-metallic table decor. Place a larger, brushed-gold charger on the bottom and a slightly smaller silver or gunmetal charger on top. Then add your dinner plate. The edges of both chargers peek out and create a full, rich frame around each setting.
If you’re working with a tight budget, search thrift shops or discount stores for mismatched chargers in similar tones. You can spray paint older plastic or worn metal ones in matte gold or soft silver to unify them. Don’t worry if they’re not perfect; once stacked, small flaws disappear under plates and napkins. For a New Year look, pair your charger stack with simple white plates and a dark napkin, such as charcoal or navy, tucked under the plate. This contrast lets the metallic layers stand out while keeping the table calm and polished.
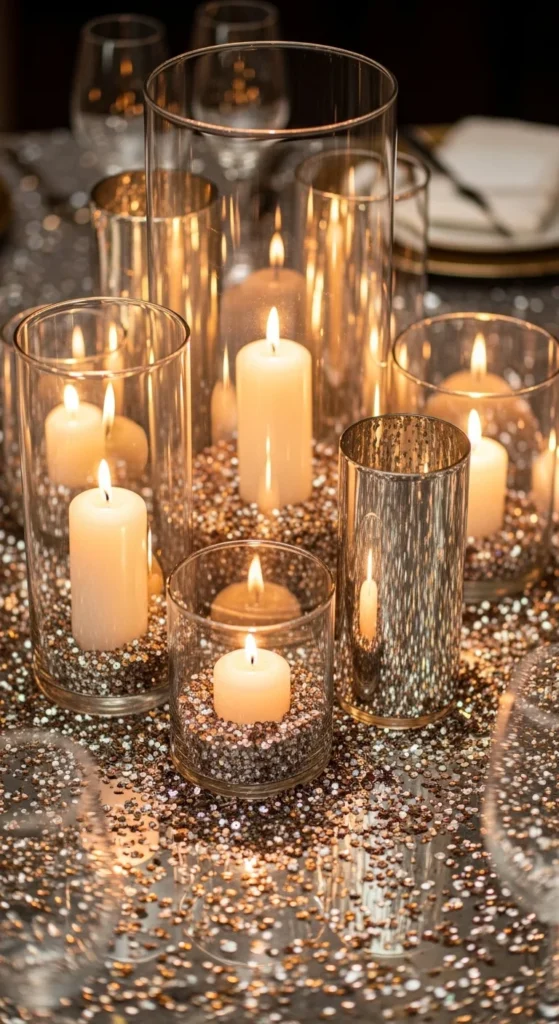
2. Layered Metallic Runner over a Dark Tablecloth
A dark base sets the stage for layered metallic accents. Start with a deep tablecloth—charcoal, black, or espresso. Lay a narrow metallic runner down the center. Choose a soft gold, bronze, or champagne fabric with a slight sheen. Then add a second layer by scattering small metallic confetti or sequins in silver and rose gold along the runner.
You don’t have to buy a special runner. Cut a length of metallic fabric or even use a thrifted curtain panel trimmed to size. For the confetti layer, mix store-bought table scatter with hand-cut circles from metallic wrapping paper. Let some pieces spill off the runner onto the cloth so it feels relaxed but intentional. Place simple glass vases or candle holders on top so the metals peek through. This layered base makes even plain dishes and glassware feel more luxurious.
3. Tiered Metal Trays as a Central Cluster

Tiered trays create instant height and structure. To keep the look rich, layer different metal finishes. Place a large gold tray on the table, then stack a slightly smaller silver tray on top using low risers, like hidden ramekins or wooden blocks. Add a third bronze or champagne tray on one side to create a stepped effect.
Decorate the trays with small pillar candles, metallic ornaments, and glass tea light holders. The goal is to let every metal surface catch light from different angles. For a budget-friendly approach, repurpose baking sheets, old serving platters, or round pizza pans sprayed in different metallic tones. If your trays don’t match, that’s fine—the mix of finishes is what makes the centerpiece feel layered. This setup works especially well on long rectangular tables where you want impact without blocking conversation.
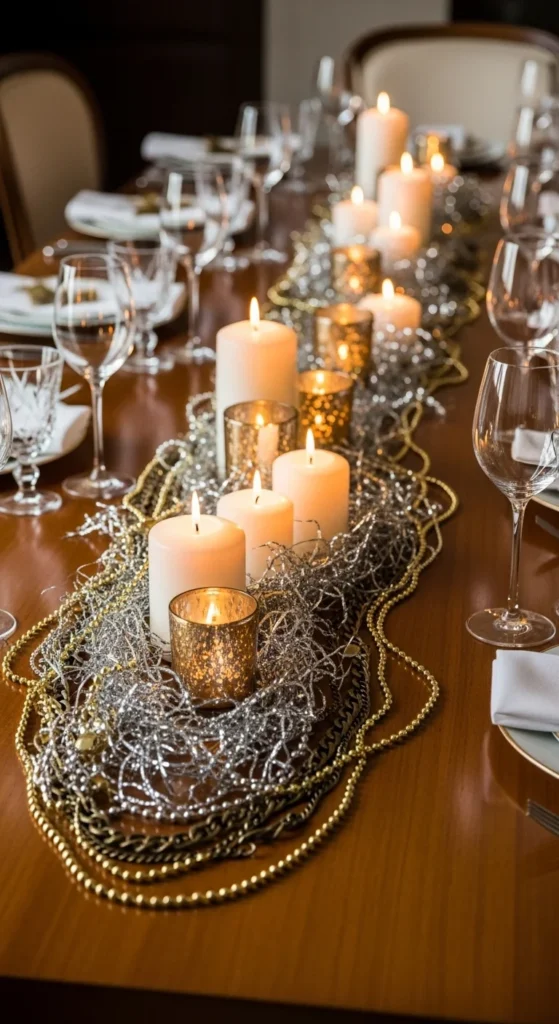
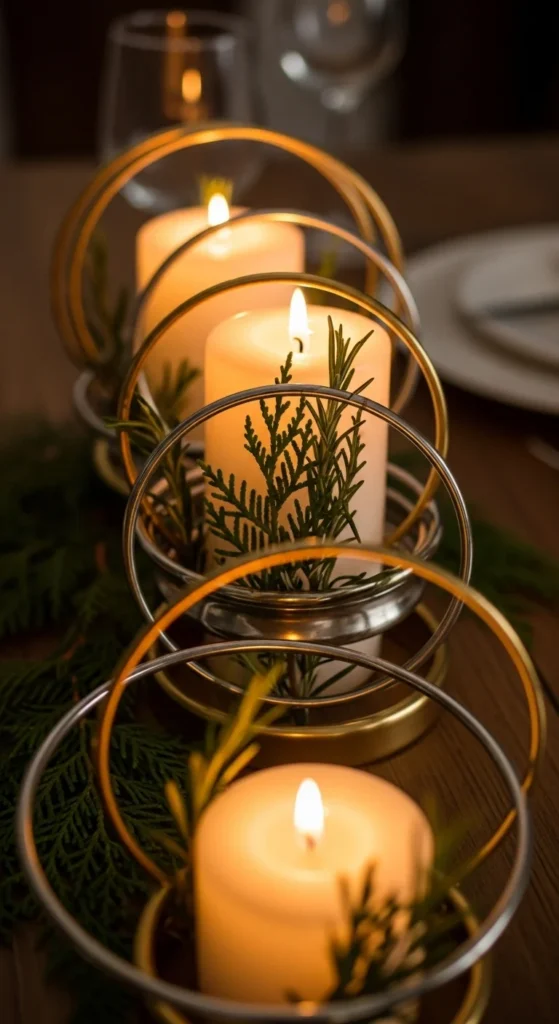
4. Mixed-Metal Candle Clusters Down the Center
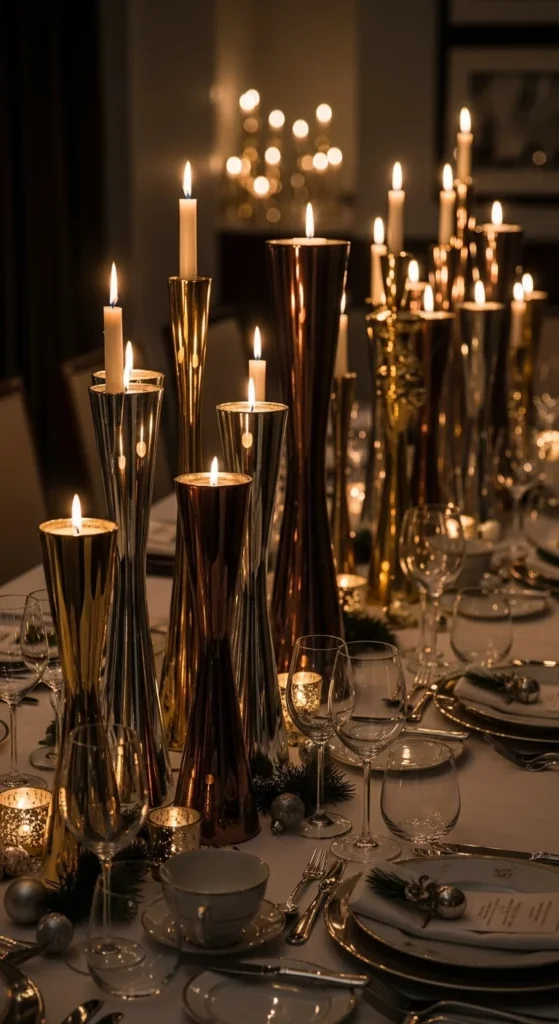
Candles are a natural partner for metallic decor. When you group candle holders in different metals and heights, the table instantly feels richer. Start with a line of candle clusters down the center—three holders per cluster is a helpful guide. Mix tall tapers, medium pillars, and low votives, all in metal holders with varied finishes.
If you only have a few metal holders, combine them with plain glass votive cups and place them on small metallic coasters or lids to create a layered base. You can spray paint inexpensive glass holders in a muted gold or pewter finish. Keep the candles themselves neutral—ivory or soft white works best—so the metals stay the focus. This setup looks dramatic in low lighting and suits both intimate dinners and bigger New Year gatherings.
5. Mirrored Tiles Under Metallic Pieces
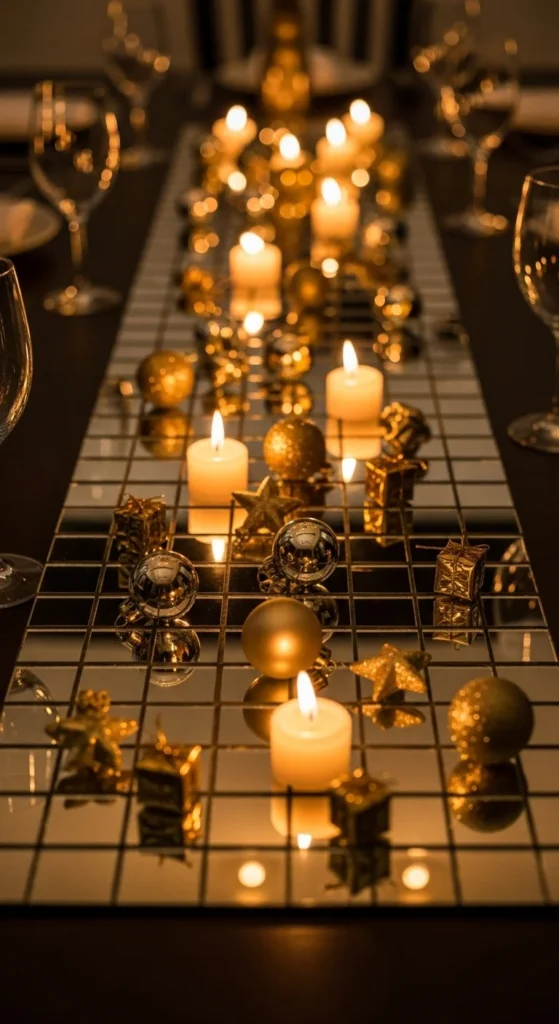
Mirrored surfaces double the effect of metallics. Place small mirror tiles or a mirrored runner along the center of the table, then arrange your metal decor on top. Candle holders, votives, metallic ornaments, and even metal bowls suddenly look richer because the mirror reflects every highlight.
For a low-cost version, use mirrored craft tiles or even mirrored plastic sheets cut to size. Leave small gaps between tiles so the tablecloth peeks through and adds texture. Avoid clutter by keeping the decor focused: a few statement candle clusters and a bowl of metallic ornaments is often enough. The mirror does the heavy lifting by catching light and bouncing it around. This trick is especially effective in evening settings where candles and fairy lights play against the reflective surfaces.
6. Layered Metallic Place Cards with Clips
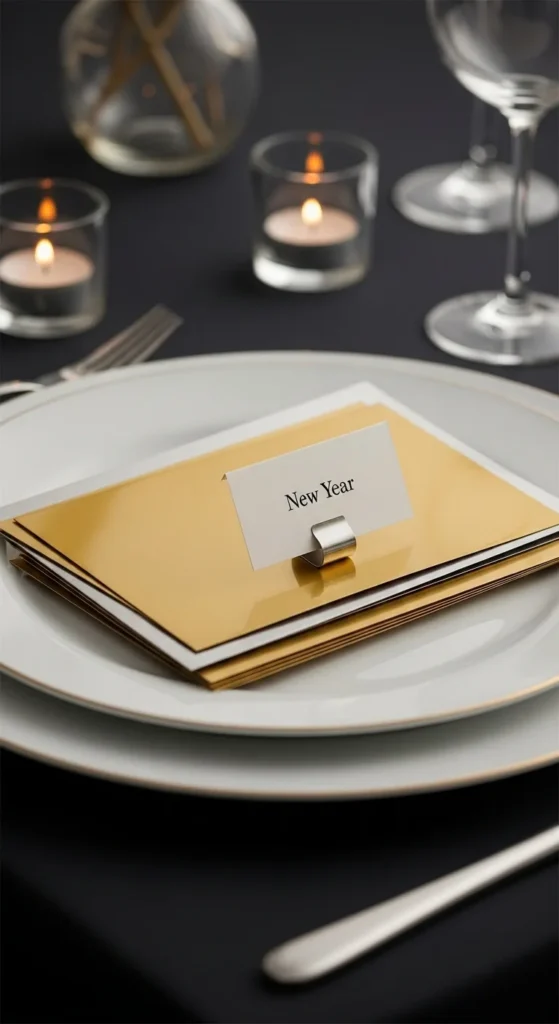
Place cards are a small detail that can carry a lot of style. Create layered-metallic place cards by stacking two rectangles of card or thin board: one larger gold piece underneath and a smaller silver or rose-gold piece on top. Attach a simple metal place-card clip or mini alligator clip at the top edge to hold a name card or handwritten tag.
You can cut the cards from metallic scrapbook paper or repurposed gift boxes. Use a white or black pen for names. If you don’t have clips, punch a small hole and tie the layers together with thin metallic cord. Rest the finished place cards on each plate or prop them against the base of a wine glass. This layering brings metallic detail right into each setting without needing expensive accessories.
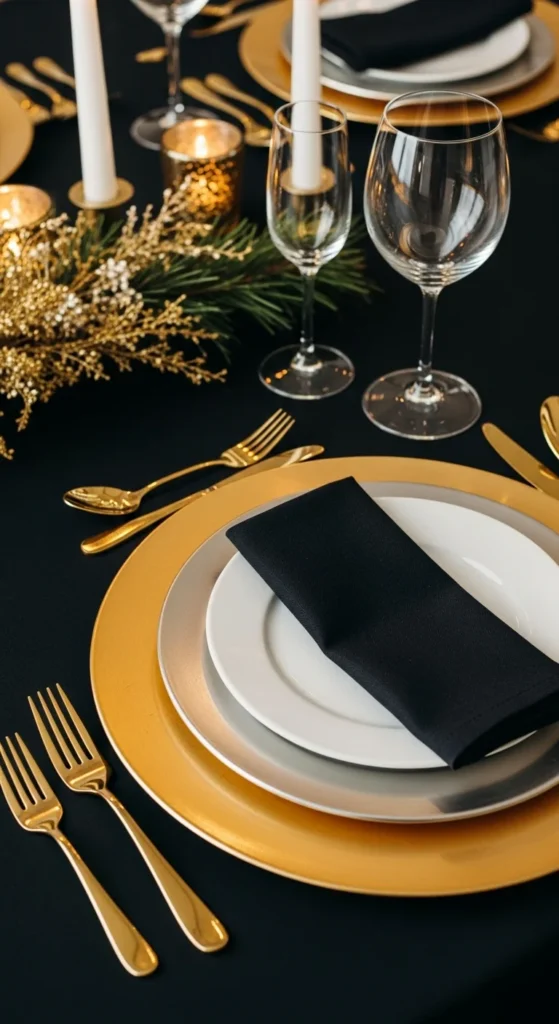
7. Mixed-Metal Flatware and Napkin Rings
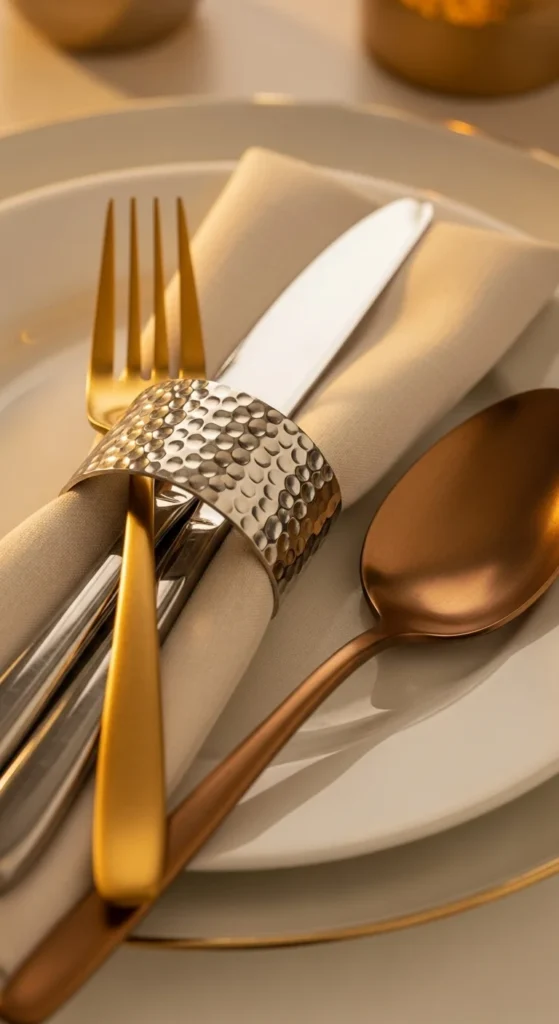
Flatware and napkin rings are perfect for subtle metal layering. Instead of matching every piece, combine gold, silver, and bronze. Use one metal for forks, another for knives, and a third for spoons. Then tie everything together with a metallic napkin ring, such as hammered brass or brushed steel.
If buying new pieces isn’t realistic, mix what you already own. Pair your usual silverware with a set of gold dessert spoons or thrifted bronze teaspoons. Spray paint inexpensive napkin rings or even simple metal washers in a warm metallic finish. Wrap a linen napkin, slide on the ring, and place it over the plate so all the metals sit together. This creates a rich layered effect right where guests interact with the table.
8. Layered Metallic Garland Down the Center
Garlands are an easy way to fill the middle of a table. For a layered-metallic look, twist together several strands: gold beads, silver tinsel, and bronze or blackened chain-style garland. Lay this rope-like bundle down the center, weaving it around candle clusters and small decor pieces.
Many of these items can come from holiday clearance bins—old bead necklaces, tinsel strands, or costume chains. If the finishes clash, give them a quick coat of matching metallic spray paint in different tones. Let the garland fall off the ends of the table slightly for a relaxed look. This layered strand ties all your metal finishes together and keeps the centerpiece visually connected from one end of the table to the other.
9. Layered Metal and Glass Center Bowl
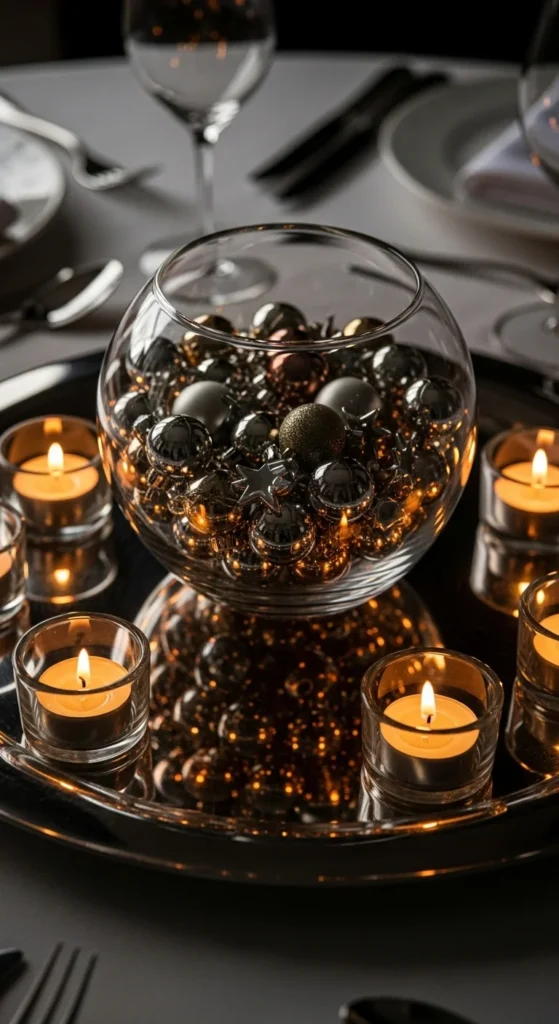
A central bowl becomes richer when you layer materials. Place a wide metallic tray on the table, then set a clear glass bowl inside it. Fill the bowl with metallic ornaments, glass baubles, or metal spheres in shades of gold, silver, and champagne. Around the outside of the bowl, on the tray surface, arrange tea lights in small metal cups.
For a wallet-friendly version, repurpose a baking tray as the metal base and use a salad bowl or vase as the glass layer. Spray paint old Christmas ornaments in coordinating metallic tones for a unified feel. The glass adds height and clarity, while the metal tray grounds the arrangement. This layered piece works well as a single statement centerpiece on round tables.
10. Layered Metallic Coasters Under Votives
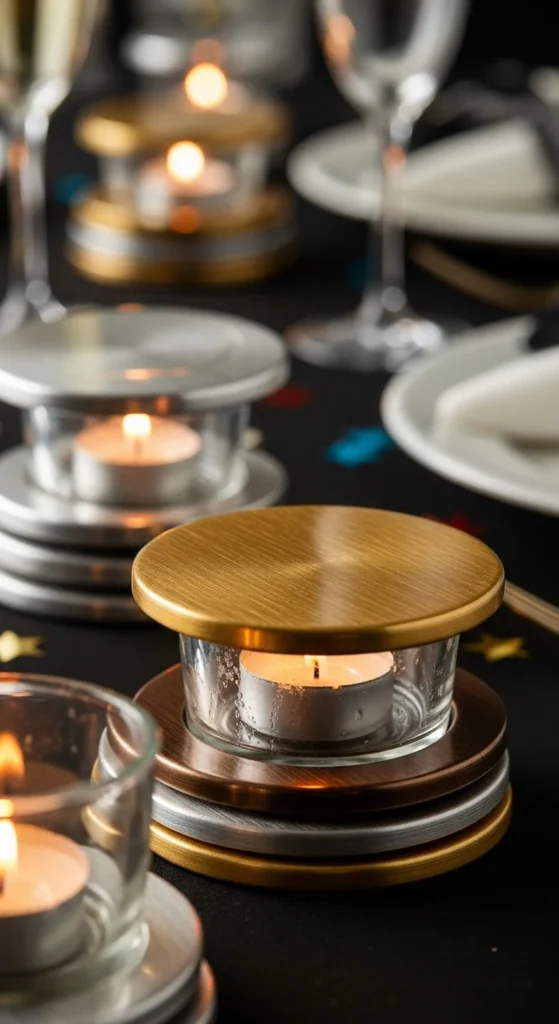
Coasters can be tiny platforms for your metallic story. Place a bronze or black metal coaster on the table, then layer a slightly smaller gold or silver coaster on top. Sit a clear glass votive holder on the stack. The candlelight will highlight both layers, making even simple tea lights feel special.
You can cut coasters from thin metal sheets, metallic cardboard, or repurposed jar lids sprayed in different tones. Mix stacks along the table so some show more gold and others more silver. Because they’re small, you can add many without crowding the centerpiece. This idea fits especially well for long tables where you want repeated metallic touches at each place setting.
11. Metal-Wrapped Vases on Mirrored Bases

Ordinary vases can join your metallic story with a quick wrap. Use metallic adhesive foil, contact paper, or thin metal tape to cover the lower half of clear glass vases. Place each vase on a small mirrored tile. Add simple greenery or single stems for height.
To keep costs low, reuse clear bottles or jars as vases. Wrap them with metallic tape in gold, silver, or rose gold. The mirror tiles can be sourced from craft stores or cut from mirrored plastic panels. Group three or five along the center of the table, alternating heights and finishes. The light will catch both the wrap and the mirror, creating a strong layered effect without much effort.
12. Layered Metallic Napkin Stack at Each Place
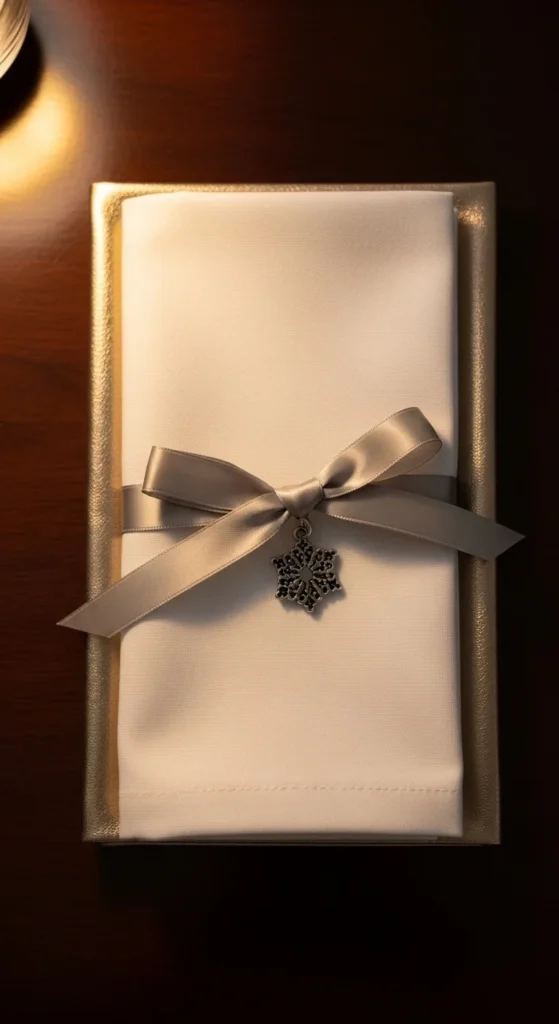
Napkins offer another chance to bring in metallic layers. Use a standard cloth napkin in white or linen and place a metallic napkin—gold, silver, or champagne—underneath. Let the bottom napkin show around the edges like a soft frame. Tie the stack with a narrow metallic ribbon and add a small metal charm or ornament on top.
You can make metallic napkins from affordable fabric or even satin remnants hemmed with simple stitches or fabric glue. For the charm, use small metal keys, stars, or repurposed jewelry pieces. This layered napkin stack instantly adds richness to each place setting and coordinates with the rest of your table’s metallic palette.
13. Layered Metal Frame as a Table Riser
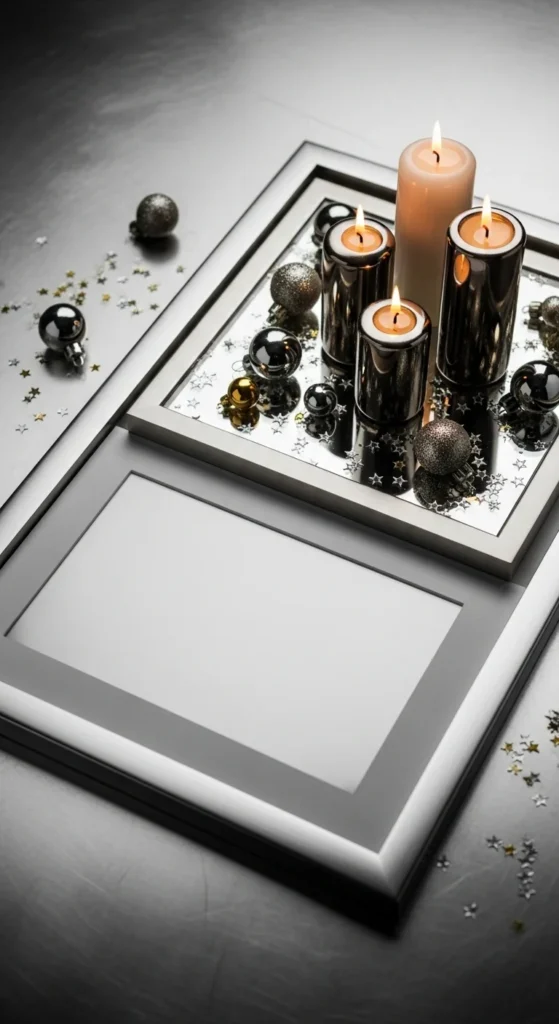
Photo frames can double as decorative risers. Place a large metal frame flat on the table and insert a mirrored tile or metallic cardstock where the photo would normally go. This creates a raised, reflective platform. Arrange candle holders, mini vases, or ornaments on top.
Thrift stores are ideal for finding affordable metal frames. If the finish is dated, spray paint them in your chosen metallic palette. Use several frames grouped together down the table, each holding a small composition of items. The combination of metal edges and reflective centers brings strong layered character for very little cost.
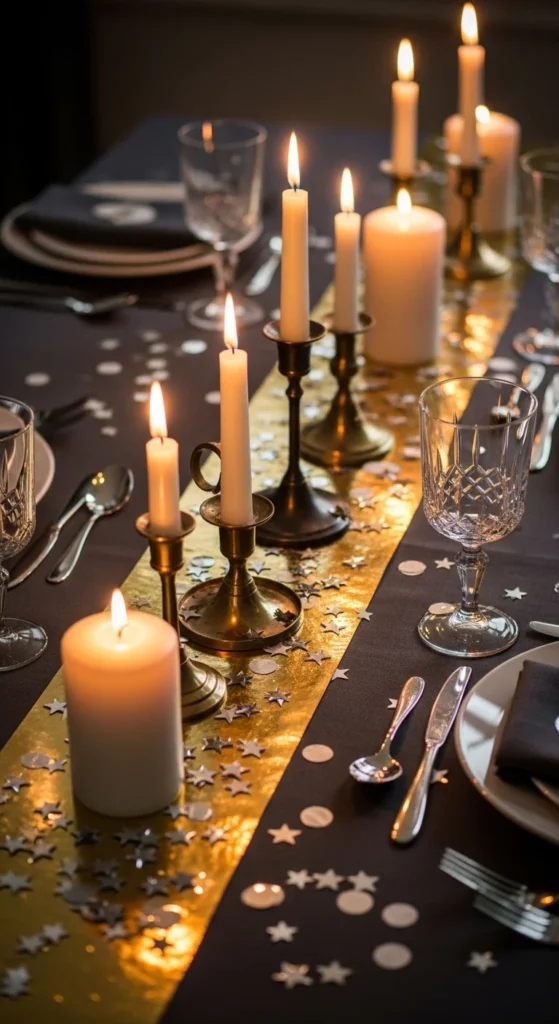
14. Layered Metallic Confetti Under Glass
A simple way to contain sparkle is to place it under glass. Spread metallic confetti, sequins, or star-shaped table scatter on the cloth. Then place clear glass cylinders, hurricanes, or cloches on top, creating islands of contained shimmer. Add candles or ornaments inside the glass pieces.
You can cut your own confetti from metallic wrapping paper or old gift bags. Use different shapes: circles, stars, or narrow strips. The glass softens the shine while the metals still catch light. This layered approach keeps the table tidy, since confetti stays under the vessels instead of spreading everywhere. It also creates visual depth with layers of glass, metal, and candlelight.
15. Two-Tone Metallic Table Numbers
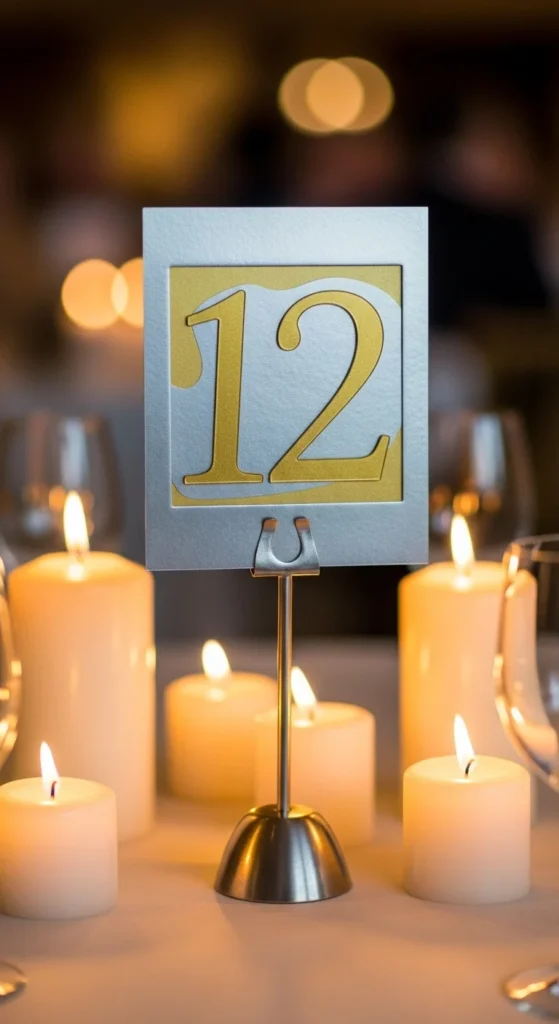
Table numbers can be small art pieces. Cut a larger rectangle from silver cardstock and a smaller one from gold or rose gold. Glue the smaller card on top and add a bold number using a paint pen or adhesive numerals. Set the finished card into a metal holder or lean it against a metal votive.
For a cost-effective option, repurpose cardboard and cover it with metallic wrapping paper before layering. Keep the font clear and simple so guests can read it easily. Place the table number near the center of the metallic decor cluster so it feels part of the design. This two-tone approach adds another layer of metal without crowding the table.
16. Layered Metal and Stone Candle Platforms
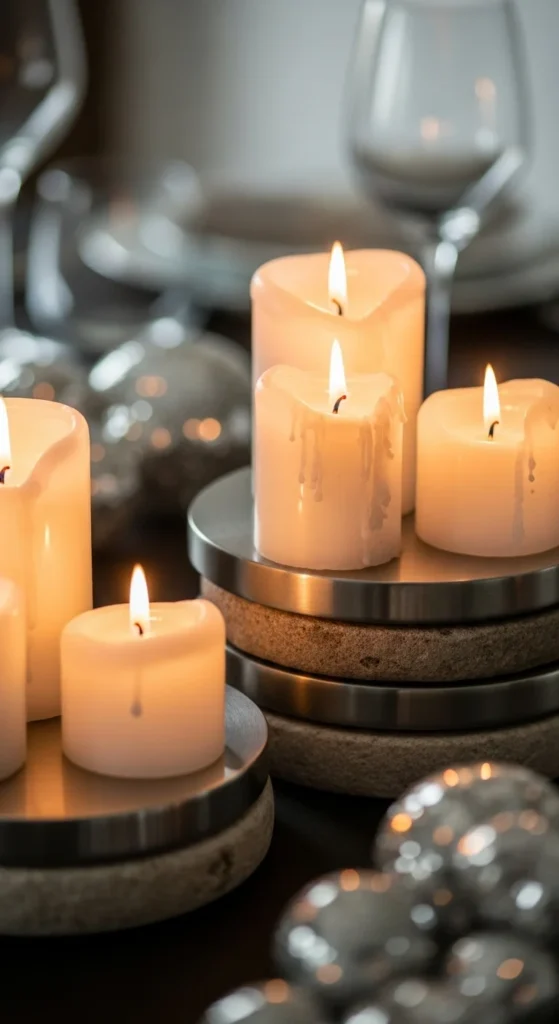
Combining stone and metal gives your candles a grounded, rich base. Stack a stone coaster or tile on the table, then place a smaller metallic coaster or plate on top. Set a pillar candle on the metal layer. The stone adds weight and texture, while the metal reflects the flame.
You can use slate, marble, or ceramic tiles as the lower layer and inexpensive metal plates or lids as the upper layer. Mix colors: dark stone with warm gold, or white marble with brushed silver. Scatter several of these platforms along the center of the table. This layered arrangement feels thoughtful and keeps candle wax away from your cloth.
17. Layered Metallic Drink Station on the Table End

Use one end of the table as a metallic drink zone. Layer two or three metal trays at different heights—one flat on the table, another raised on a cake stand, and a smaller one stacked on sturdy boxes wrapped in metallic paper. Place an ice bucket, champagne flutes, and bottles on the trays.
Look for budget trays at thrift shops and unify them with spray paint if needed. Boxes covered in metallic gift wrap make excellent risers. Keep the center of the table focused on dinner decor while the end holds the drink display. The layered metals at the drink station help the whole table feel connected and luxurious without needing expensive bar carts.
18. Layered Metallic Ornament Runner
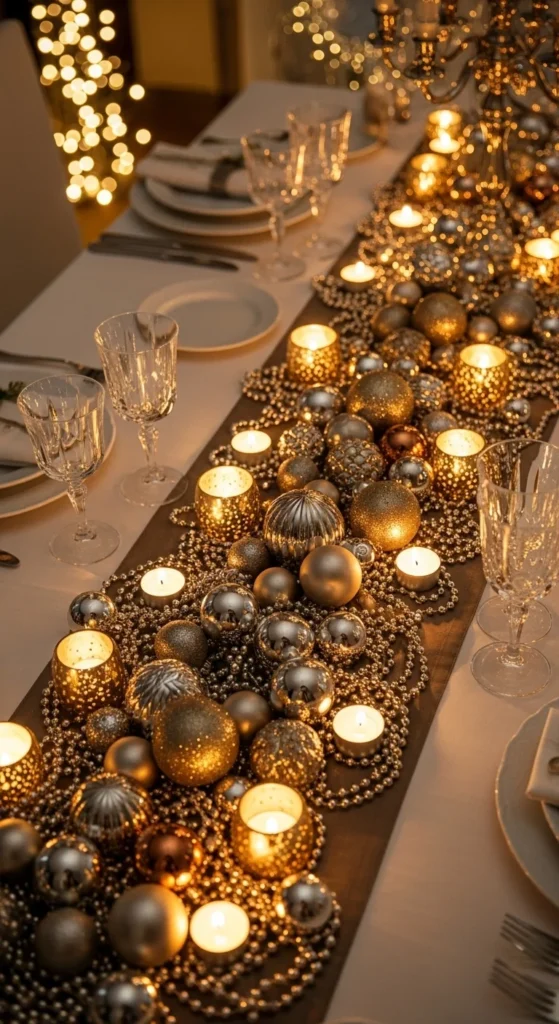
Ornaments are not just for trees. Create a low, layered metallic runner by piling metallic ornaments along the center of the table. Mix finishes—matte gold, shiny silver, brushed bronze, and champagne. Weave metal bead strands or thin chain garlands through the ornaments. Tuck small candle holders between them.
Use ornaments you already own and repaint any that clash using metallic spray paint. Keep the color palette tight for a richer look. This runner works best on a solid cloth so the metals stand out clearly. It’s an easy way to fill a long table without needing floral arrangements, and it packs away neatly after the celebration.
19. Layered Metallic Accent Plates for Dessert
Dessert gives you another chance to add metallic layers. Place small gold or silver accent plates under your dessert plates. Stack them so a thin metallic ring shows beneath the white plate. Serve cake, tarts, or chocolates on top. The extra plate instantly makes dessert feel more special.
Search for small metal plates at thrift shops or use sturdy plastic ones with a metallic finish. If they don’t match perfectly, keep similar tones on each table. When dessert is finished, leave the metallic accent plates in place as part of the decor. This simple layer carries the metallic theme through the final course without extra work.
20. Layered Metallic Candle Rings and Greenery
Candle rings add a soft finishing touch. Use metal hoops or metal-looking rings as bases around your pillar candles. Layer one larger hoop on the cloth, then a smaller hoop closer to the candle. Tuck small sprigs of greenery or eucalyptus between the rings.
You can make rings from metal craft hoops or thick wire shaped into circles. Spray paint them in varying metallic shades. The greenery softens all the metal and connects your table decor with the rest of the room. Keep the foliage low so it doesn’t interfere with conversation. This layered detail works well on both dining tables and smaller side tables.
21. Layered Metallic Chair-End Accents on the Table Edge
The edge of the table can carry metallic detail as well. Tie strands of metallic ribbon—gold, silver, and champagne—around the table edge at each place setting, letting them fall toward the chairs. Attach a small metal charm, ornament, or bell at the end of each strand.
Use leftover ribbon and ornaments from holiday decor. If they clash with your palette, repaint them with metallic spray. This layered fringe of metals frames the table and visually connects chairs with the tabletop styling. It works especially well for New Year dinners where guests stay seated for a while and can appreciate the detail up close.
22. Layered Metallic Cloche Moments Along the Table

Cloches create small worlds on the table. Place metallic bases—such as small trays, saucers, or lids—down the center. Set a tiny ornament, metal clock charm, or mini figurine on each base. Cover with a clear glass cloche. Use different metallic finishes for the bases so each vignette feels rich and layered.
You can repurpose jar lids painted in metallic tones and use inexpensive glass domes or even upside-down vases as cloches. Spread these mini displays along the runner between candle clusters. Guests can enjoy the detail up close, and the repetition of glass over metal gives the table a polished, New Year-ready look.
Conclusion
Layered metallic table decor turns a simple New Year meal into a memorable experience without needing a large budget. By stacking chargers, mixing finishes on candle holders, using mirrors and trays as reflective bases, and repeating metals through small details like napkin rings and place cards, your table gains depth and warmth. Choose a few ideas that fit what you already own, add a couple of thrifted or DIY metallic pieces, and build a table that feels rich, welcoming, and ready for the countdown.
ChatGPT can make mistakes. Check important info.
Leave a Reply